Monday, February 28, 2011

Flowers feed the soul

It's another challenge at Less is More. The challenge this week is three squares.
I looked at the blog on Saturday, but had a busy weekend, so only got to my crafting space tonight after work.
My last stamp order included some beautiful Flourishes stamps, and this challenge was calling their name. I had an idea of what I wanted to do as soon as I saw the challenge.


This card came together in less than 20 minutes. 

I stamped three of the tulips and coloured them with copics. I then attached to the green background (the white squares are 1.5x1.5 and the green is 1.75x1.75). I then pressed the stacks into versamark and coated with clear embossing powder The squares are layered onto a confetti paper from Recollections (Michaels) and then layered onto the green card. The sentiment is also from Flourishes. 

Tomorrow is March 1, and this card gives me hope that spring is right around the corner. I hope!

Friday, February 25, 2011

More mouse

These cards have been sitting on my stamping table for a bit. I kept meaning to take photos, but the time always seems to get away from me.

This is my entry for the Splitcoaststampers Christmas card challenge for March.


I cut the circles on my Cricut and stamped the image. I coloured with Copics and added extra shine to the image by coating it with glitter paint.
The red striped paper is from a stack I've had for a while and I overlaid it on top of the black to give it a little more pop. The sentiment is from House Mouse as well, and was printed on plain white card which was then punched with my snowflake punch.

It came together rather quickly- the longest part was waiting for the paint to dry.

Wednesday, February 23, 2011

Spring has sprun...

Well, not quite, but it has over at Less is more. The week three challenge is spring. 
I didn't post last week because I was way too busy getting ready for a major event at work, which was held Feb 19. It was a huge hit, and thankfully, Monday was a holiday. I took advantage of it and retreated to my crafty area, and made several cards. 

I got a couple of new Tim Holtz stamps in the mail last week, and couldn't wait to play with them. 

This one is probably my favourite. 


The colour really jumped out at me when I was deciding the colours to use.

It took no time to do, but it was a multi-step process.

First, I stamped the background in black ink and clear embossed it.
Then, I wet the paper, and smooshed distress inks all over it, wet it and crumpled the paper. I then wet it again, added some more ink, blotted the paper with a paper towel and gently (VERY gently) rolled it between my hands like I was making a play dough worm. As a result, the paper is rather leathery. I then dried it a little with my heat tool, and ironed it to smooth it out a bit. 
As it was embossed, I ironed it face-down on a piece of cardstock and very carefully lifted it off. 

Here's a close-up of the stamp- it shows the paper off a little better.

I then cut out around the stamp, ran it through my xyron and added a black mat behind. The three brads on the top give it a bit more dimension. 

The paper, I think is Stampin' up, but I don't have the package any more, so can't be sure. I think the greens in the background go well with the card. I usually do a white card, but decided to make it all green. 

I have several other cards to share, and will do that in the next little bit. 


Saturday, February 12, 2011

New toys!

I ordered several Flourishes stamps from One Crazy Stamper, and they arrived on my day off. I was deciding how I wanted to start with them, and came across a blog challenge at Less is More. Their style is clean and simple, and their challenges reflect that. 
The challenge for this week is to make a single layer card (not something I usually do), and to use a flower or tree stamp. This was the perfect time to try my gerbera daisy stamp. 


The flowers were stamped using Memento ink and then coloured with Copic markers.The stems were coloured with pencil, as I didn't have the right colour Copics. The sentiment is from the $1.50 bin at Michaels and was stamped in a coordinating colour. I think this is  a style I'll be experimenting with more- I like the simplicity of it, and it's nice not having to worry about coordinating paper colours or ribbon.

Friday, February 11, 2011

I need spring

You know you're from the prairies when you open the door in the morning and think that -10 is warm.
We are finally out of the deep freeze (for now). I've had enough of the snow and cold, so it's time for a spring-inspired card!
I saw this technique a while ago (can't remember where, though). It's alcohol ink on acetate. Pretty easy to do.
Stamp the image you want on cardstock (I used white card). Take a piece of acetate the same size as the cardstock and smoosh the alcohol inks all over it. Let it dry for a bit. I then ran the stamped cardstock through my Xyron sticker maker face down to make the front sticky so that I could place the acetate on top of it.
I then rounded the corners and attached it to the beige and red cardstock backs.
I punched the bottom of the 5.5x4.25 piece of cardstock to dress it up a bit and placed it on top of the red and added the sentiment.
I think next time, I'd use some lighter colours so that the stamp is more visible.

I think I'll be doing some creating this weekend... we'll see what transpires.

Sunday, February 6, 2011

Challenging myself

I have many, many, many spools of ribbon. Too many, actually, especially when you consider that I cannot, for the life of me, tie the perfect (or any, really) bow for my cards. I do like to put strips of ribbon on my card, and will sometimes tie a knot. I have spools that haven't been opened yet, so I challeneged myself to use at every spool of ribbon I have, and I will not be buying more until I am finished with what I have. I am sure my husband will be happy about that one.

So, the challenge to myself was to pick a ribbon that hasn't been opened and create a card using it as my inspiration.


This orange and yellow combo was from a pack of ribbon. I wasn't sure I would ever use it, but with really cold temps last week, I was in the mood for a bit of spring, and this card came together fairly quickly, once I decided what I wanted to do.
I started by picking the papers (again, organizing them in colour groups was THE BEST thing I could have done). I wanted to incorporage flowers, and punched these three out. I decided they needed a little something else, so I embossed them using Swiss Dot and Swirl Cuttlebug embossing folders. I embossed the background with Swiss Dot as well.
I stamped the sentiment (from the $1.50 bin at Michaels) and then ran the piece through the Cuttlebug. The card stock was layered, and the yellow flower is attached with a piece of double sided foam. I ran some orange ink around the edge of the card and called it a night.

Saturday, February 5, 2011

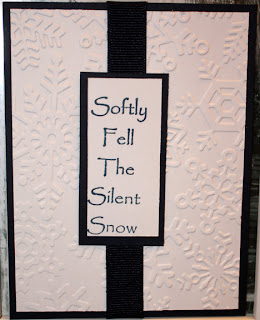
Silent Snow

The weather here has been balmy for the past couple of days, hovering around zero and the snow is actually melting, which is a nice thing to see. However, this is Manitoba, and it's still a long way until spring, so anything can still happen.

This card is for the February Christmas Card Challenge over at Splitcoast Stampers.


The embossing folder and sentiment were both purchased at Scrapyard in Stonewall. The sentiment jumped out at me, and it was on the clearance table, so I allowed it to come home with me. 
This card (and the 14 others like it) took no time to make. It took longer to cut the cardstock than to do the stamping and embossing combined. 

The snowflakes and sentiment are both on plain white card, and layered on dark blue cardstock. The ribbon is also Navy. 

Having the February challenge done when it's not even the first week of February is a great feeling, especially when the cards I have planned for March are a little more intensive. 

I had a burst of cleaning energy today, and got my stamping area completely tidied up today. I am feeling the creative juices flowing, and can't wait to see what gets created this week.